
How to Install a Bike Kickstand (Step by Step)
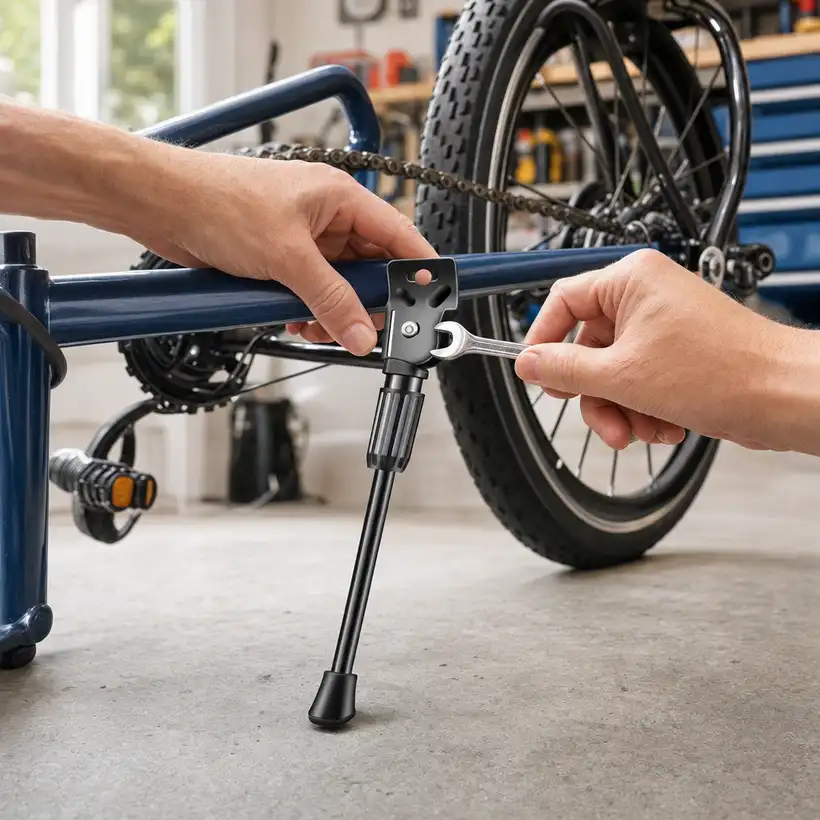
Fitting a kickstand is one of the few bicycle jobs that is genuinely a ten-minute task, and it is also one of the few where a small error is invisible until the bike falls over in the driveway. There is exactly one bolt, one flat plate and one leg, and none of it requires special tools. What it does require is getting the plate in the right place on the frame, because that position sets the angle the bike leans at and there is no adjustment afterward that will save a bad choice.
The other thing worth knowing before you start is that bicycle frames were not all designed with this part in mind. Some have a dedicated flat pad brazed onto the rear triangle with a threaded hole already in it. Some have a plain round tube and nothing else. Some have a brake caliper, a rack mount or a welded seam occupying exactly the spot you want. Spending two minutes looking at the rear of the bike before you pick up a tool will tell you which of those three situations you are in, and that determines everything that follows.
What you need before you start
Lay the bike on its non-drive side, or better, turn it upside down on a folded towel so the rear triangle sits at eye level. Working with the bike the right way up while lying on a garage floor is possible, but it makes it hard to see whether the plate is sitting flat, and sitting flat is the whole job.
Wipe the chainstay clean where the plate will sit. A film of dried mud between the plate and the tube compresses over the following week and turns a tight bolt into a loose one. That single wipe prevents a large share of the loosening problems described further down this page.
Thickness of the steel mounting plate, which is why it does not flex when the bolt is torqued down
— Kickaroo product specification, 2026
Where a side-mount kickstand goes on the frame
The reason is structural. The chainstay is the stiffest tube on the rear of a bike and it runs almost horizontally, so a clamp there transfers the weight of the bike straight down through the leg into the ground. The seat stay above it is a thinner tube designed to handle tension rather than a sideways load, and mounting a lever to it puts force in a direction it was never drawn for.
The left side is the convention on every bicycle sold in the United States, and there is a practical reason behind it: the chain, the derailleur and the chainrings are all on the right, so the left stay is the clear one. It also means the bike leans away from its own drivetrain when parked, which keeps the chain out of the dirt.
Position along the tube is the one decision that matters. Closer to the pedals, the leg reaches down and slightly forward, and the bike sits more upright. Closer to the rear axle, the leg reaches further out, and the bike leans more. If the length you ordered is a good match for the wheel size, the middle of the flat section is the right starting point. If you are between sizes, this is the adjustment that saves you: read the kids bike kickstand sizing guide before you commit to a hole position.
The part nobody warns you about: the bolt
Check the chainstay bracket before the package arrives: if a bolt is already there under a blanking cover, the fitting is a two-minute job and you need nothing else.
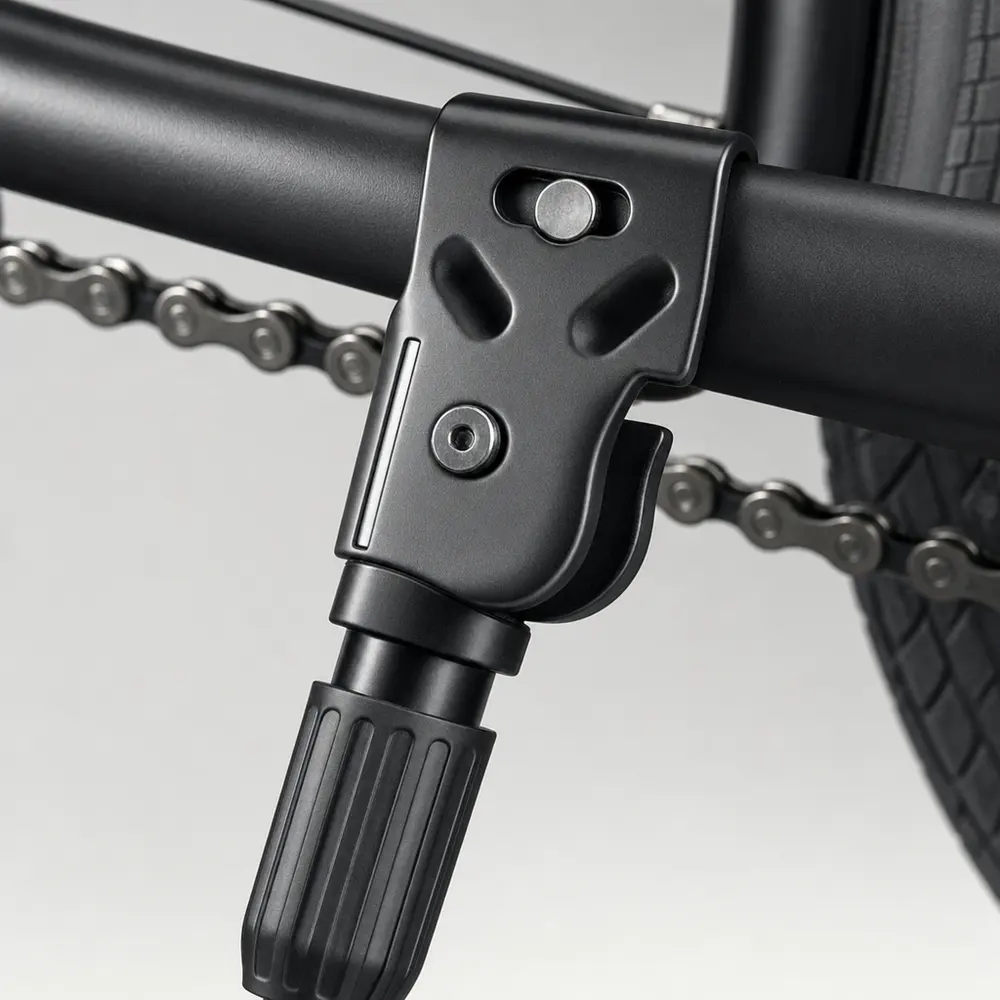
There are three easy ways to get a bolt. If the bike already had a kickstand, the original bolt is the correct one and it is already the right length for that frame. If the bike has a threaded kickstand mount built into the chainstay, a bolt matching that thread is what you need, and any bike shop can hand you one over the counter. If neither applies, a bolt and a nylon-insert lock nut that pass through the 10.5 mm hole will clamp the plate to a plain round tube.
The correct bolt depends on your frame. What we can tell you precisely is the size of the hole it has to pass through: 0.41 in, which is 10.5 mm. Take that number to the hardware store and you will not leave with the wrong thing.
Diameter of the mounting hole in the plate, equal to 10.5 mm
— Kickaroo product specification, 2026
The installation, step by step
- Turn the bike over or lay it down. Rest it on a towel so the rear triangle is easy to reach and nothing scratches. Make sure both tires are properly inflated first, because a soft rear tire changes the height you are about to set the lean angle against.
- Find the flat section of the left chainstay. Run a finger along the tube from the pedals toward the rear axle. You are looking for a stretch of at least an inch where the plate can sit without rocking on a weld or a taper.
- Clean that section. Wipe off dirt, old grease and any loose paint flakes. A clean metal-to-metal contact is what keeps the bolt tight.
- Hold the plate against the tube. The leg should point down and slightly back when the stand is deployed, and it should fold forward flat against the stay when retracted. If it folds backward into the rear wheel, the plate is on upside down or on the wrong side.
- Pass the bolt through the 0.41 in (10.5 mm) hole. If the frame has a threaded mount, the bolt threads into it. If it does not, the bolt passes through and takes a nut on the far side.
- Tighten by hand until the plate stops moving, and no further. You want it snug enough that it holds position but loose enough that a firm push can still shift it.
- Set the bike on its wheels and put it on the stand. Look at it from behind. The bike should lean toward the kickstand at a clear angle, roughly the lean of a bike propped against a low curb. It should not stand bolt upright.
- Adjust if needed. Leaning too little means moving the plate back toward the axle. Leaning too much means moving it forward toward the pedals. Change one thing at a time and look again.
- Tighten fully. Firm and solid, using a short hex key or a small wrench rather than a long lever. This is a thin-walled tube on a child's bike, and overtightening can dent it.
- Fold and deploy the leg five times. It should swing cleanly without catching the tire, the chain or the frame at any point in its travel.
If a weld or a caliper is in the way
The plate is symmetrical, so nothing prevents an inboard mount: a raised weld or a brake bracket on the outer face simply means the plate goes on the inside, and it lands just as flush.
There is one thing to verify when you mount inboard, and it takes five seconds. Spin the rear wheel and watch the tire clear the plate and the folded leg. On a wide-tire bike, the space between the tire and the inner face of the stay can be tight, and a plate that touches a rotating tire will wear a groove into it over a summer. If the clearance is not there, move the plate forward toward the bottom bracket, where the stays are further apart.
A rear disc brake caliper is the other common obstruction on 18 and 20 inch bikes. It usually sits on the inner face of the stay near the axle, which pushes the kickstand plate forward toward the crank. That is a workable position, though it makes the bike sit a little more upright, so check the lean carefully before the final tightening. Details for that size are on the 20 inch bike kickstand page.
Keeping the bolt from working loose
A kickstand takes an impact every time the bike is set down, and repeated impacts are what walk a plain bolt loose. That is why the locking nut matters more here than on a part that never moves.
Medium-strength threadlocker is the standard answer and it costs a few dollars. Put one drop on the threads before assembly, not after, and give it the cure time on the bottle before the bike goes back into use. It holds under vibration and still lets you remove the bolt later with a hand tool. Do not reach for the high-strength grade, which is designed to need heat to release.
If you would rather not use chemicals on a child's bike, a nylon-insert lock nut does the same job mechanically. The nylon collar deforms around the thread and resists backing off. Either way, put a note in your phone to check the bolt after the first week. That one check catches nearly every loose kickstand before it becomes a kickstand lying in the road.
If the leg does not fold back on its own
It is worth showing a child once how the leg parks, whatever the bike: a leg left half-deployed can catch a pedal on the first stroke away from the curb. Set the pivot so the leg swings with a light push of the foot, and the habit takes care of itself.
The rubber sleeve on the foot has a similar character. It is a friction fit over the end of the tube, and one buyer reported theirs coming off, adding that "with good glue it's not a problem." A drop of contact adhesive inside the sleeve makes it permanent in a minute.
The three checks before you hand the bike back
The lean check is visual. Stand behind the parked bike and look at the angle of the seat tube against a vertical line such as a door frame. A correctly set kickstand leaves the bike leaning noticeably toward the stand. If the bike looks nearly upright, it will fall the first time a sibling brushes past it.
The clearance check is mechanical. Fold the leg up, then turn the cranks backward through two full rotations while watching the left pedal and the left crank arm pass the folded stand. On small frames with short chainstays, a long stand folded flat can sit exactly where the crank arm wants to be. Better to find that in the garage than at the top of a hill.
The bolt check is the one to repeat. Tight now, checked again after a week, and then once at the start of each riding season. That is the entire maintenance schedule for this part.
Common problems and what fixes them
| What you see | Usual cause | Fix |
|---|---|---|
| The bike leans too far upright and tips the other way | The leg is longer than the frame height needs | Move the plate forward toward the bottom bracket, or fit the next length down |
| The bike leans so far over it slides down | The leg is short for this frame | Move the plate back toward the axle, or fit the next length up |
| The plate will not sit flat on the tube | A weld bead or a shaped chainstay is in the way | Mount on the inner face of the stay instead of the outer face |
| The bolt keeps working loose | Vibration on rough pavement | Add threadlocker or a nylon-insert lock nut and retighten after the first week |
| The leg does not fold all the way back | The pivot is overtightened or dry | Back the bolt off a fraction and work a drop of light oil into the pivot |
| The rubber foot slides off the leg | The sleeve is a friction fit | A drop of contact adhesive inside the sleeve holds it permanently |
If the symptom is a lean angle that cannot be fixed by moving the plate at all, the length is wrong for that frame rather than the position. That is a sizing question, and the sizing guide covers what to do about it, including the buyers who shortened the tube themselves. Photos of finished installs from buyers are on the reviews page.
Average across 416 verified buyer ratings for the Kickaroo kids bike kickstand
— Kickaroo verified buyer ratings, 2026
Where to go next
The three companion guides are the sizing guide, the adjustable versus fixed comparison and the piece on whether kids bikes need kickstands. For adult trail bikes, which are a different mounting problem entirely, see the mountain bike kickstand guide. Everything is listed on the blog index, and you can reach us through the contact page with a photo of the frame if the mounting point looks unusual. The 16 inch length has its own page at 16 inch bike kickstand, and the person writing all of this is introduced on the about page.
Get the length that fits the bike on the stand
Five lengths for 12 to 20 inch wheels, one price, free shipping, and 30 days to send it back if the fit is wrong.
See the kickstand and pick your size